

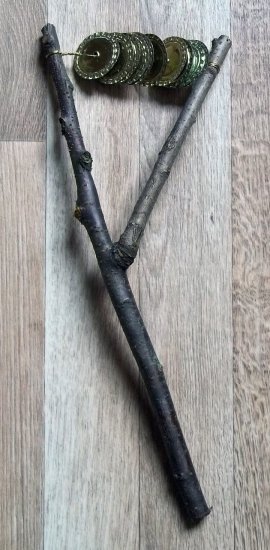
Sistrum (bottle-top rattle/shaker)

)
This musical project was inspired by the ancient Egyptians - Nefartari (wife of Rameses II) can be seen holding a sistrum in a painting on one of the walls at the temple of Abu Simbel in Egypt.
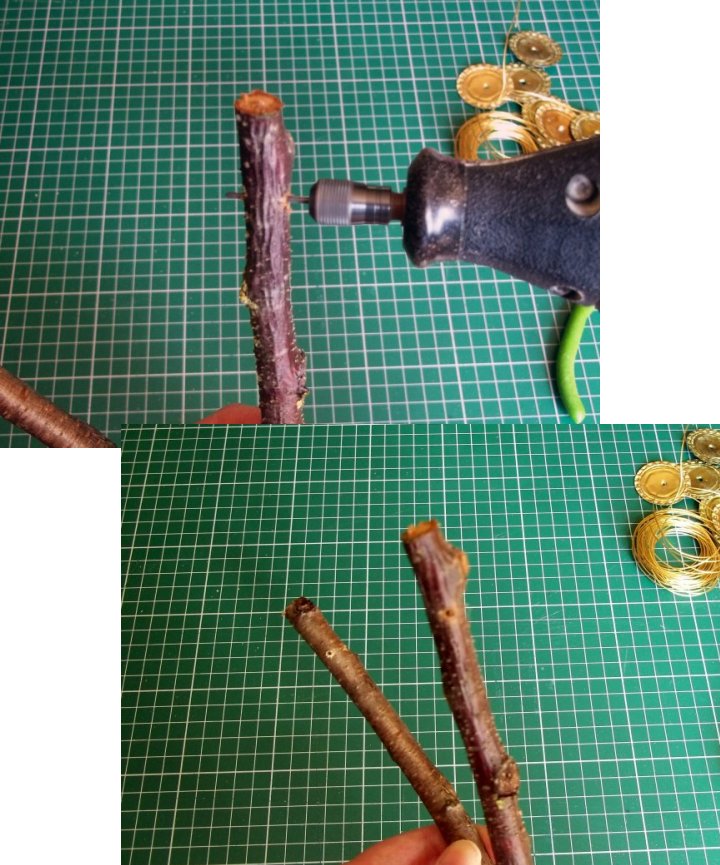
I needed to prune a cherry tree in our back garden last week and came away with several Y-shaped sticks which are perfect for making this project. When I made a sistrum with one of my kids a few years ago for a school project we took a walk down by the local river and found Y-shaped sticks which had naturally fallen off the trees. So take a nature walk and you never know what you might find that can be made into musical instruments.
Adult help/supervision will be required when using the cooker hob, hammer & nail, clippers & drill etc.
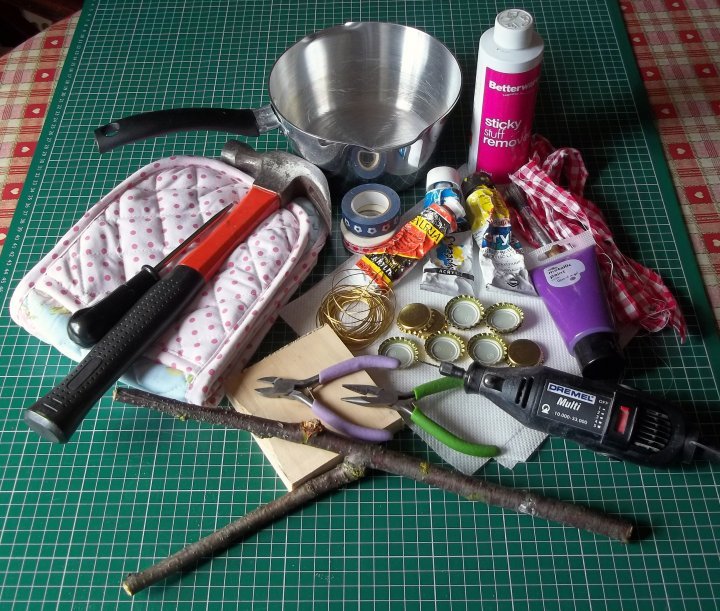
You will need:
Several metal bottle-tops
Small saucepan, water, cooker hob
Oven glove
Craft pliers
Sticky stuff remover & kitchen paper
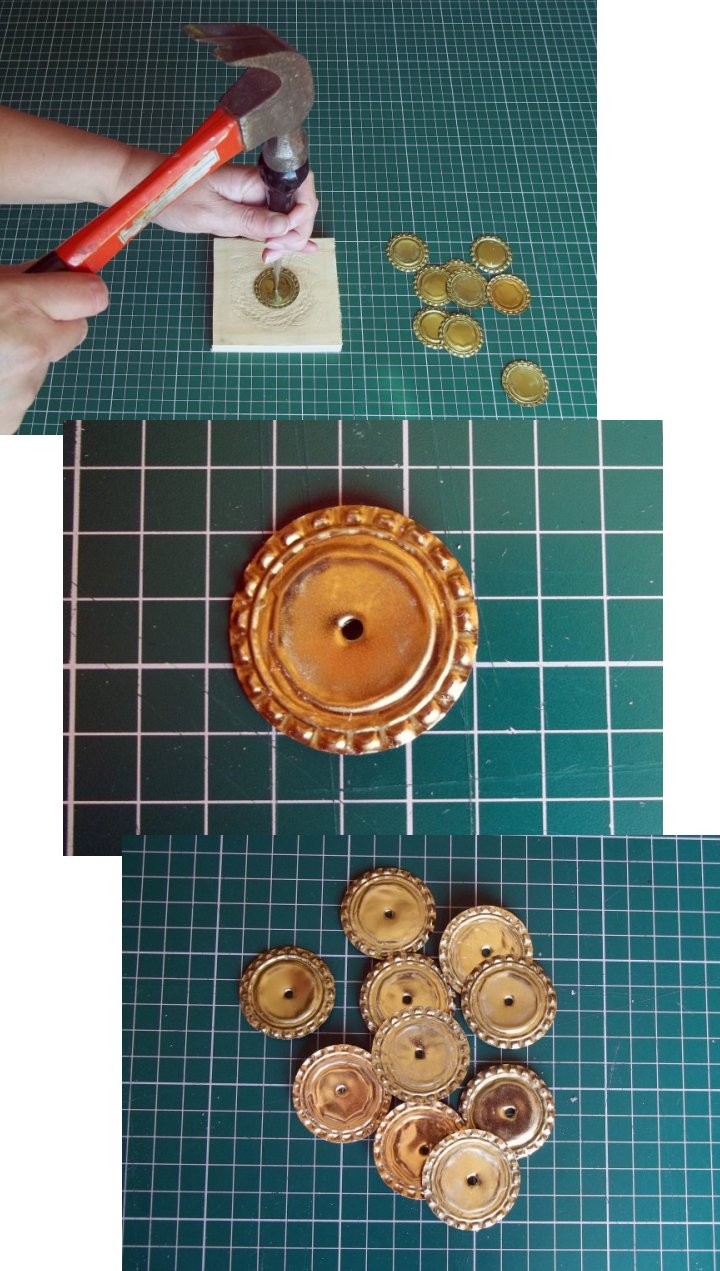
Hammer & scratch awl or large nail Scrap of wood
Picture wire or thin garden wire
Craft wire clippers
Rotary hobby tool (Dremel) with small drill bit
Optional - acrylic paints, washi tape or strips of fabric
What to do
1. In order to create the best sound from your sistrum the first thing you need to do is remove the plastic liner from the bottle caps.
**TOP TIP - Using water from a recently boiled kettle will speed up the process. - TOP TIP**
1a. Place your bottle-tops in the saucepan and cover with water. Bring the water to the boil and simmer the bottle-tops for 5 minutes.
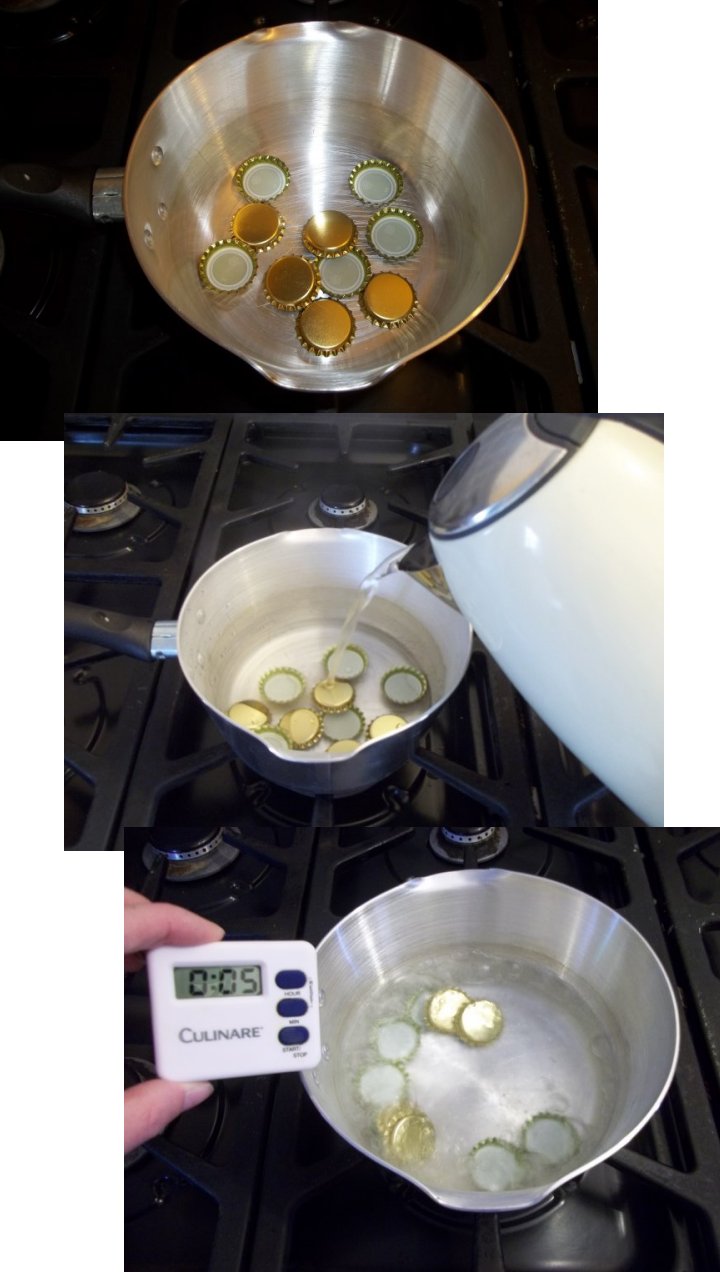
1b. Carefully lift out one bottle-top with the pliers, hold it with an oven glove and using the pliers, grip the plastic edge and pull out the plastic insert. Repeat with the rest of the bottle tops.
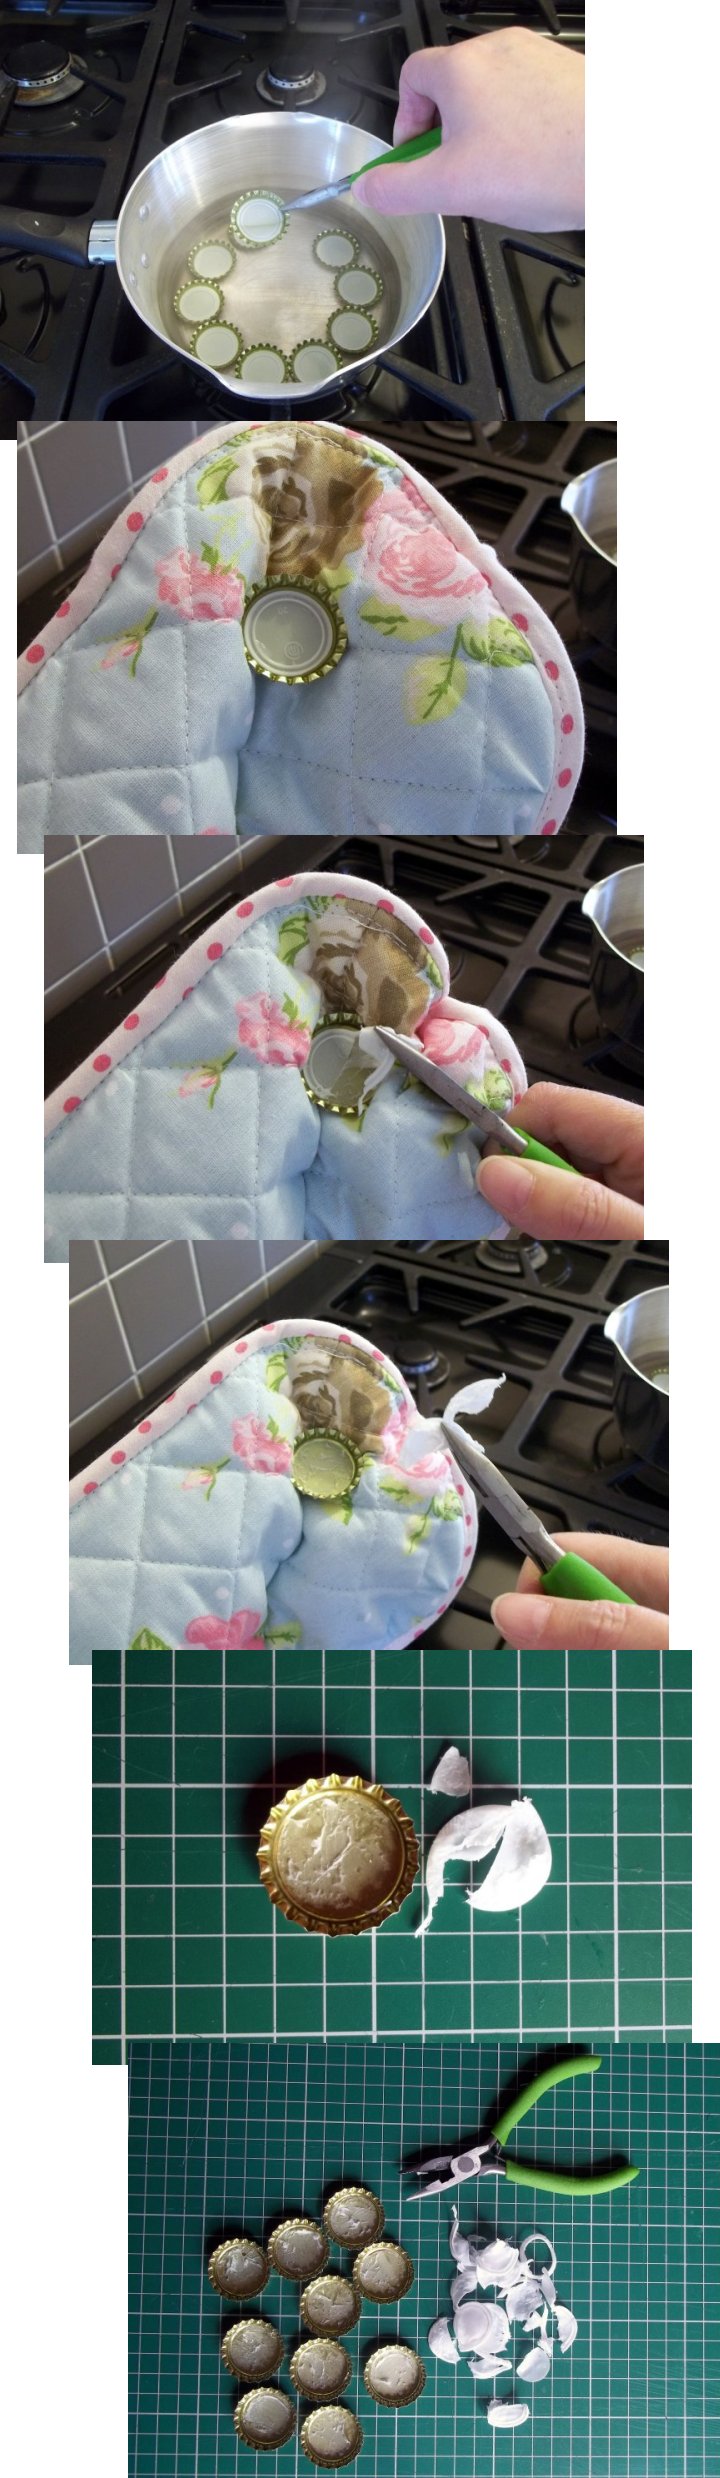
1c. There will probably be some glue stuck to the bottom of the caps, this can be removed by squirting some 'sticky stuff remover' into the tops, let them sit for a few minutes to soften the glue, and then scraping with your fingernail wrapped in kitchen paper or cutting a piece from a kitchen sponge and rubbing with the scouring end to remove the glue.
(You can then give them a quick wash in warm soapy water if you like to get rid of any gluey gunk.)

2. Place a bottle-top with the inside face up on a piece of scrap wood and carefully flatten the edge with a hammer (mind your fingers), then turn it over and hammer the other side too. Your bottle top will now be flat. Repeat with the other tops.
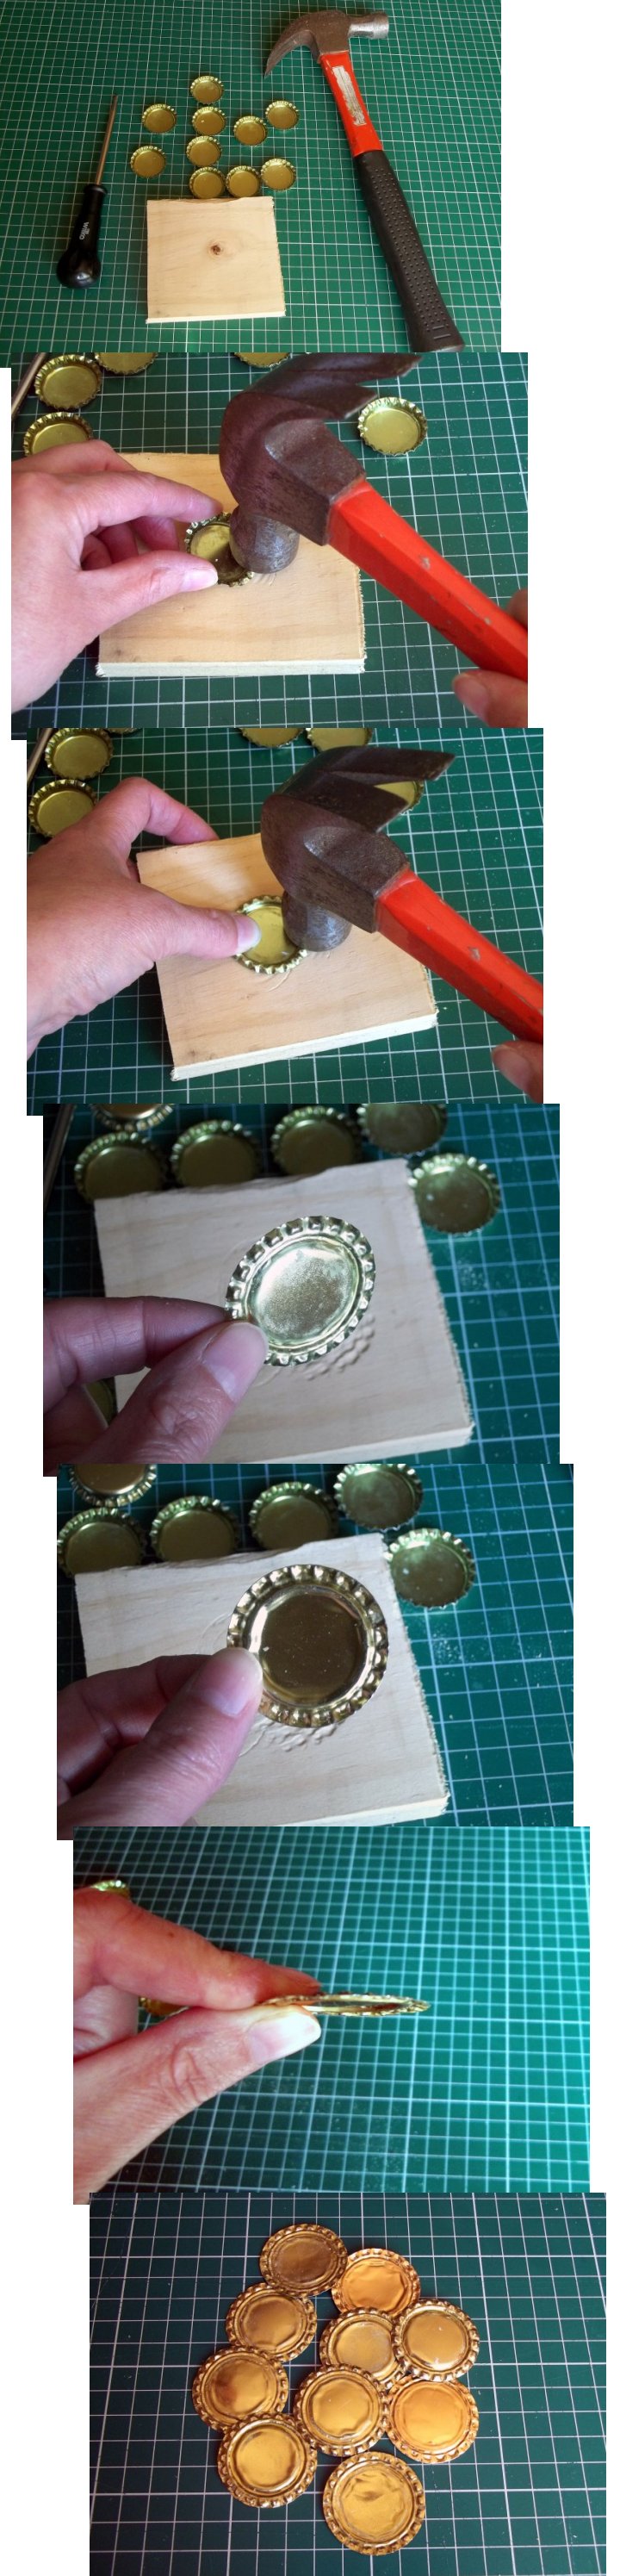
3. Then place one of the flattened tops on the scrap wood and punch a hole in the centre of it with a scratch awl or large nail and hammer. Repeat with the other tops.
4. Drill a small hole (big enough to thread the wire through) 1 - 2 inches from the top of each of the sticks 'arms'.
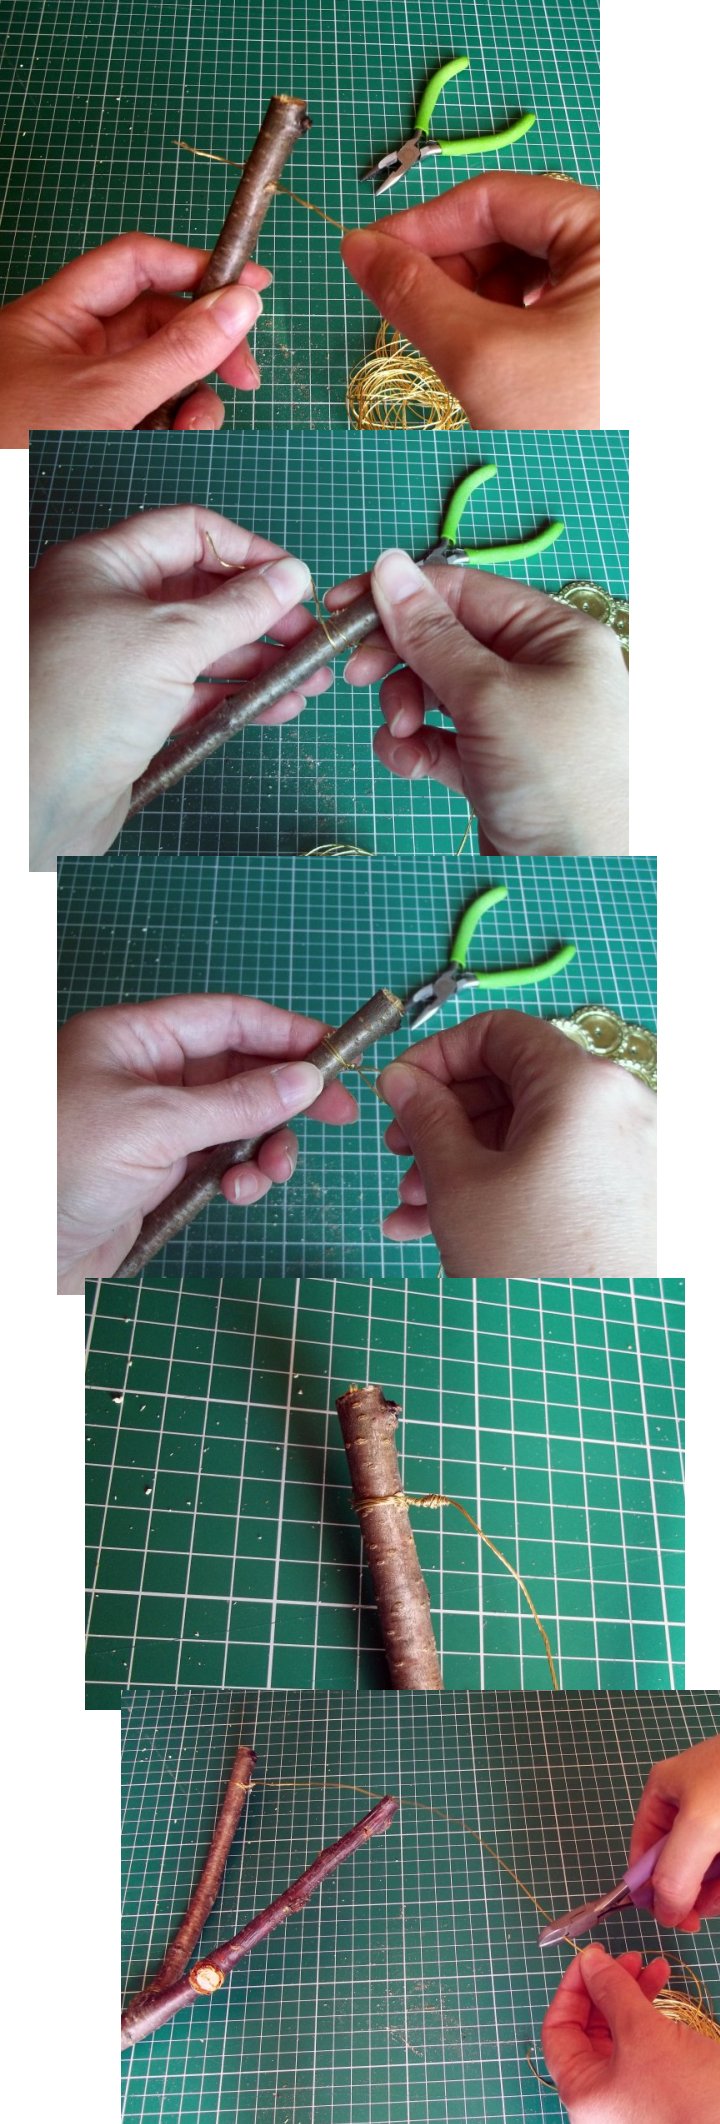
5. Thread the wire through one of the holes and wrap it tightly around the stick a few times, twisting it so that it is secure and no sharp ends sticking out (I gently squeezed the ends & wire together with the pliers). Cut the wire about twice the size of the gap between arms.
6. Thread the flattened bottle-tops onto the wire.
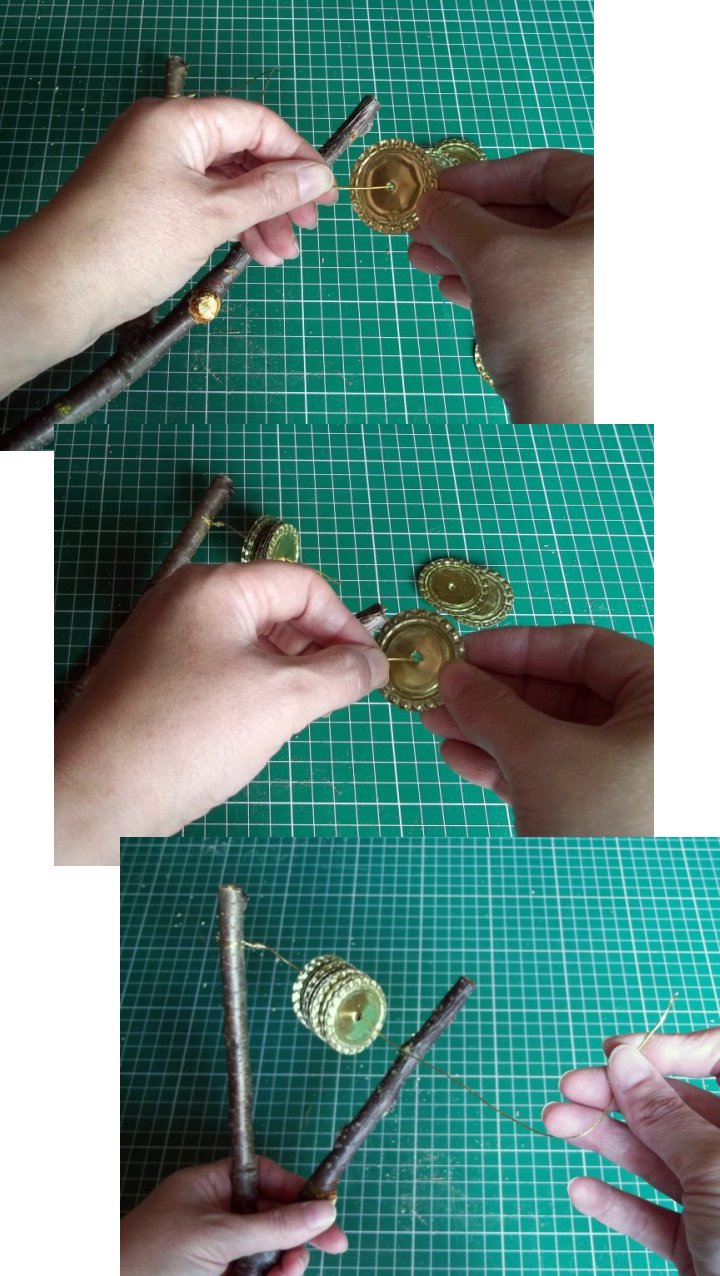
7. Thread the other end of wire through the sticks second arm, pull the wire tight then wrap the wire around the arm a few times and twist it to secure.

8. Snip off any excess wire and make sure that there are no sharp ends sticking out (I again gently squeezed the pliers gently over the wire ends to flatten them).

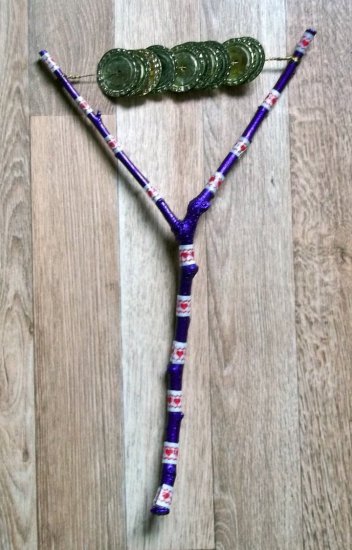
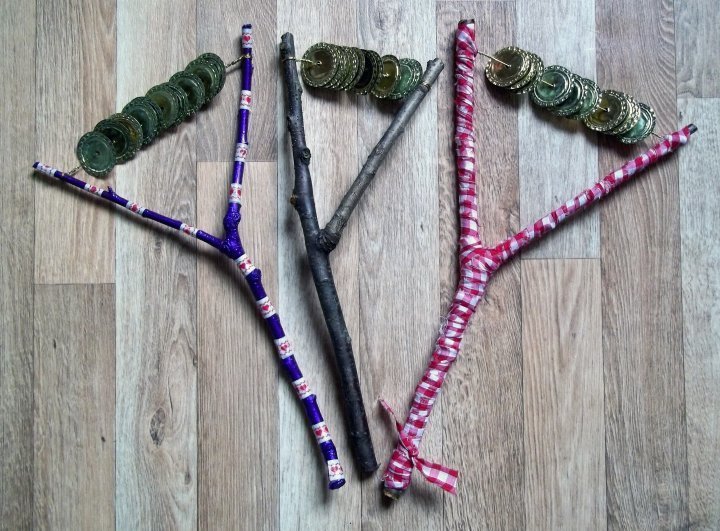
9. Your sistrum is now ready to play (just gently shake) or you can decorate it if you like.
10. Optional - Decorate your sistrum by painting it with acrylic paints, adding brightly coloured washi-tape or tying & wrapping strips of fabric around it.
a. Acrylic paint & washi-tape:
1. Protect area with newspaper.
2. Paint on a couple of coats of paint. Leaving to dry between coats.
3. Leave to dry overnight.
4. Cut strips of washi-tape and wrap them around the stick part of your sistrum.

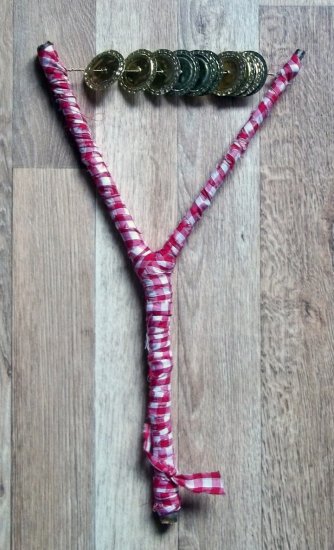
b. Fabric strips:
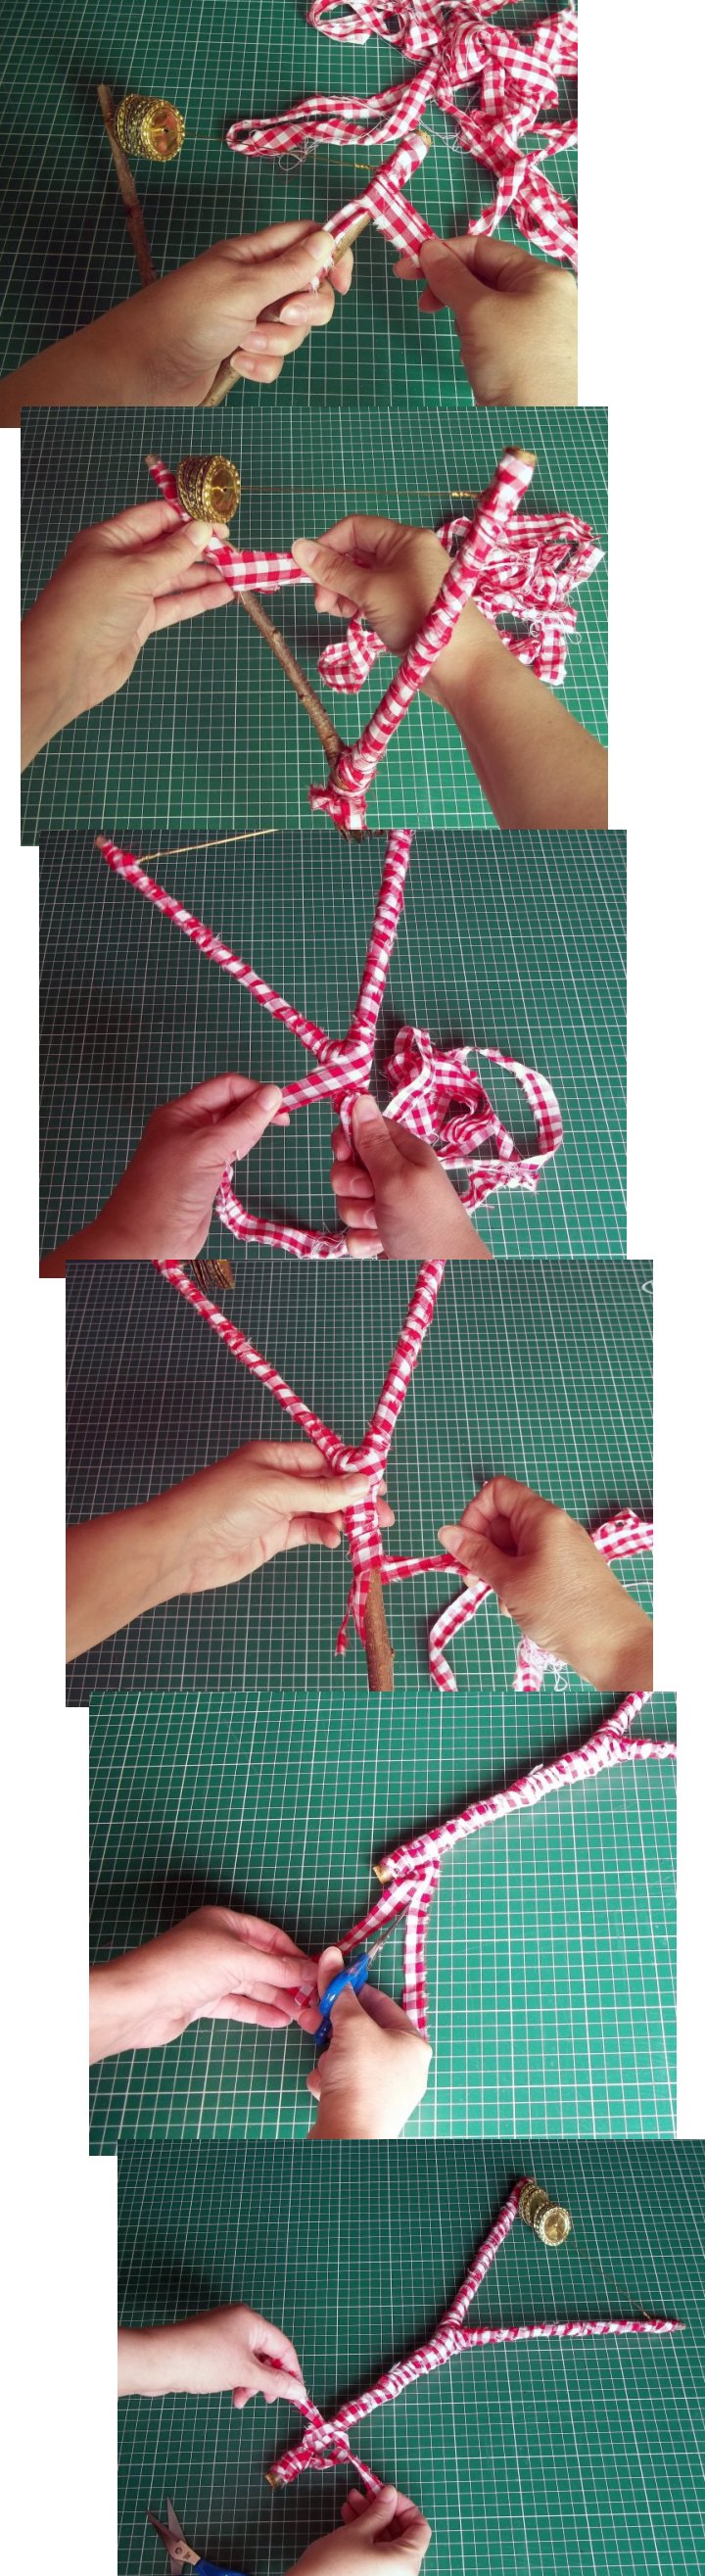
1. Tie a strip of fabric around the top of one of the arms of the sistrum, and then wrap the fabric around and down the arm, cut up the strip 5 or 6 inches, this makes two joined strips (see pic 5 below) and tie a knot around the base of the arm.
2. Repeat for the second arm, tying and wrapping the fabric.
3. Then tie and wrap around the trunk part of the stick, starting where the arms branch off and working your way down the trunk, cutting up the fabric 5 or 6 inches, making two joined strips and then tying around the trunk, knotting to secure.
Shake your sistrum and make some music.
Back to the Musical Instruments menu...
Back to the Other Stuff projects menu...